Know the Essential Healthcare Portals for Mental Health Credentialing
Discover the essential healthcare portals for mental health credentialing. This guide covers key systems like I&A, NPPES, and CAQH that are crucial for managing provider information and ensuring smooth credentialing. Master these systems to streamline your credentialing process.

Since you've decided to start your own mental health practice, it’s time to dive into the essential healthcare technology systems you’ll need to master. This article, directly from pie Health's Complete Guide to Credentialing and Billing for Mental Health Practices, will walk you through the key systems that are crucial for managing your provider information and ensuring a smooth credentialing journey.
If technology isn’t your thing or you need some help, remember that pie Health can handle all of this for you. Don't let the tech stuff hold you back!
Preparation
In the credentialing journey, it’s essential to understand and navigate several key systems that manage healthcare provider information and facilitate various administrative processes.
These systems help providers easily manage their practice information and meet regulatory requirements by streamlining the credentialing and enrollment processes.
Overview of Key Systems
Identity & Access Management System (I&A)
- CMS uses the I&A System to manage your credentials and access permissions for multiple systems.
- Create an account in the I&A system to securely log in and manage roles in various CMS systems. This ensures only authorized people can access sensitive information.
National Plan and Provider Enumeration System (NPPES)
- NPPES is responsible for assigning National Provider Identifiers (NPIs) to healthcare providers, ensuring unique identification within the healthcare system.
- Providers use their I&A credentials to log into NPPES to apply for and manage their NPIs, which are essential for billing and credentialing.
Provider Enrollment, Chain, and Ownership System (PECOS)
- PECOS is used for Medicare enrollment and managing provider and supplier information.
- Providers use their I&A credentials to access PECOS, where they can enroll in Medicare, update their enrollment information, and manage reassignment of benefits.
How These Systems Work Together
The integration of I&A, NPPES, and PECOS forms a cohesive system that simplifies the complex administrative tasks required for healthcare provider management.
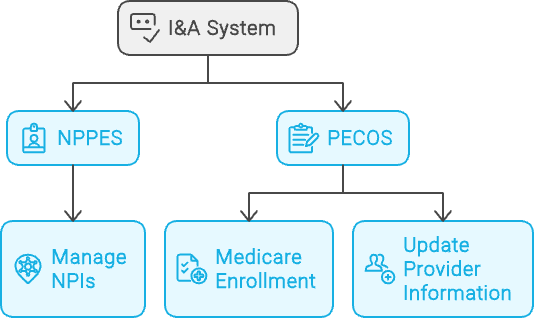
- Creating an I&A Account: Providers begin by creating an account in the I&A system. This account is vital as it provides secure access to both NPPES and PECOS. It also allows for the delegation of responsibilities to surrogates who can manage the provider’s information on their behalf.
- Getting an NPI through NPPES: Once an I&A account is set up, providers use these credentials to log into NPPES. Here, they apply for their NPI, a unique identifier required for billing and administrative tasks across all healthcare transactions.
- Enrolling in Medicare via PECOS: After obtaining an NPI, providers use their I&A credentials to log into PECOS. In PECOS, they complete their Medicare enrollment, ensuring they are recognized as legitimate providers within the Medicare system. PECOS uses the NPI obtained from NPPES to maintain accurate and consistent provider information.
Note: Regardless of whether you plan to enroll in Medicare, it is necessary to register with the NPPES system and manage access to it through the I&A portal. This ensures you have control over your NPIs and other vital information. You may also want to have access to PECOS if you need to opt out of Medicare services. Proper management of these systems is crucial for maintaining accurate and up-to-date provider information.
Steps to Navigate to the I&A System and Create an Account
1. Access the I&A Portal
- Go to the Website: Open your web browser and navigate to the I&A System portal.
- Enable JavaScript: Ensure JavaScript is enabled in your browser for the I&A System to function properly.
2. Start Account Creation
- Click on ‘Create Account’: On the I&A System homepage, find and click the “Create Account” button.
- Enter Basic Information: Provide your name, email address, and other requested information. You will need a valid email address to verify your account.
3. Set Up Security Credentials
- Create a Username and Password: Choose a secure username and password. Ensure your password meets the specified security requirements.
- Security Questions: Select and answer security questions. These will be used for account recovery and verification.
4. Verify Your Email
- Check Your Email: Look for a verification email from the I&A System.
- Complete Verification: Click the verification link in the email to confirm your account and complete the setup process.
5. Log into the I&A System
- Return to the I&A Portal: Go back to the I&A System portal.
- Login: Enter your new username and password to log in.
6. Manage Your Account and Roles
- Profile Setup: Complete any additional profile setup steps as prompted.
- Assign Roles: If you are managing information for an organization or need to assign surrogates, follow the prompts to assign roles and permissions.
Steps to Navigate to NPPES and Manage NPIs
1. Access the NPPES Portal
- Go to the Website: Open your web browser and navigate to the NPPES portal.
2. Log into Your Account
- Use I&A Credentials: Enter the username and password you created through the I&A System to log into NPPES.
- Two-Factor Authentication: Complete any required two-factor authentication steps if prompted.
3. Apply for an NPI
- Start a New Application: Once logged in, select “Apply for an NPI” from the main dashboard.
- Fill Out the Online Form: Provide all required personal and professional information, such as your name, contact information, practice details, and taxonomy (specialty) codes.
- Review and Submit: Carefully review the information you’ve entered to ensure accuracy. Submit the application once all required fields are completed.
4. Receive Your NPI
- Application Processing: After submission, your application will be processed. This typically takes a few days.
- Notification: You will receive an email notification once your NPI is assigned. You can also log back into NPPES to check the status of your application.
5. Manage Your NPI
- Update Information: Log into NPPES to update your NPI information as needed. This includes changes in your contact details, practice locations, or specialties.
- Renewal and Maintenance: Ensure your information is kept up to date to comply with regulatory requirements and facilitate accurate billing and credentialing.
6. Assign a Surrogate
- Assign Roles: If you want someone else to manage your NPI, log into the I&A System and establish a connection with your surrogate. Assign them the appropriate roles and permissions.
- Surrogate Acceptance: The surrogate must accept the connection and assigned roles in their I&A account to start managing your NPI.
Steps to Navigate to and Log into PECOS
1. Access the PECOS Portal
- Go to the Website: Open your web browser and navigate to the PECOS portal.
2. Log into Your Account
- Use I&A Credentials: Enter the username and password you created through the I&A System to log into PECOS.
- Two-Factor Authentication: Complete any required two-factor authentication steps if prompted.
3. Navigate the PECOS Dashboard
- Welcome Page: Once logged in, you will see the Welcome page, which provides options for managing your enrollment applications.
- Dashboard Options: The dashboard will display various options such as “My Enrollments,” “View Enrollment,” and “Revalidation Notification Center.”
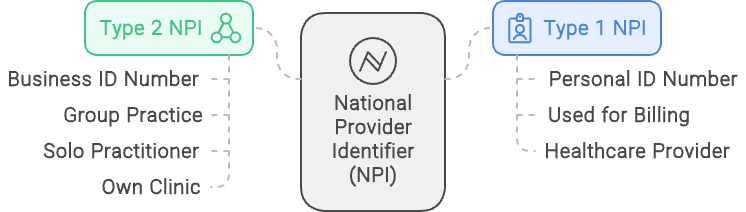
Understanding NPIs
When you’re getting into credentialing, NPIs are essential. Here’s a simple breakdown:
- Type 1 NPI (Individual): Your personal ID number as a healthcare provider. Think of it as your social security number, but for your professional life. You’ll use this when billing for services you personally provide.
- Type 2 NPI (Organizational): If you’re part of a group practice or running your own clinic, you’ll need a Type 2 NPI. This is like a business ID number for your organization. Even if you’re a solo practitioner with your own practice, you’ll need both Type 1 for you and Type 2 for your practice.
Why NPIs Matter
- Billing and Claims: Insurance companies use NPIs to track billing and claims. Without these numbers, you can’t get paid.
- Credentialing: NPIs are part of the credentialing application. Insurance companies need these to verify your identity and qualifications.
- Compliance: NPIs are required by HIPAA (Health Insurance Portability and Accountability Act) for all healthcare providers.
Tips for Managing Your NPIs
- Keep Them Safe: Treat your NPIs like any other important ID numbers. Keep a record in a secure place.
- Update Information: If anything changes (like your address or practice name), update your information on the NPPES website. CMS guidelines require updates within 30 days of any changes to avoid reimbursement delays or denied claims.
Setting Up Your Credentialing Profile with CAQH ProView
In addition to the key systems like I&A, NPPES, and PECOS, you will also encounter and need to set up a profile with CAQH ProView. This system plays a vital role in the credentialing process and is widely used by insurance companies to verify your credentials.
Note: While CAQH is not required by all states—Texas, for instance, has its own credentialing requirements—it is still highly beneficial to have a CAQH profile. This is particularly useful if you work with third-party companies for secure information transfer or if you plan to practice in multiple states that do use CAQH.
Overview of CAQH
The Council for Affordable Quality Healthcare (CAQH) is a nonprofit organization that collaborates with health plans, providers, and related organizations to streamline healthcare administration. CAQH aims to reduce the administrative burden on healthcare providers by standardizing and automating various processes associated with provider data management, credentialing, and enrollment.
What is CAQH ProView?
CAQH ProView is an online platform where you can store all your credentialing information in one place. Many insurance companies use CAQH ProView to verify your credentials, making it an important tool in the credentialing process.
Why You Need CAQH ProView
CAQH ProView helps you stay organized and makes it easier for insurance companies to verify your credentials, speeding up the whole process.
Setting Up Your CAQH Profile
- Create an Account: Go to the CAQH ProView website and sign up. Provide some basic information to get started.
- Complete Your Profile: Fill out all the required sections, including personal details, education, work history, licenses, certifications, and malpractice insurance.
- Upload Documents: Upload copies of your licenses, insurance, certifications, and any other relevant documents.
- Authorize Payors: Grant access to the insurance companies you work with, allowing them to verify your information.

Managing Your CAQH ProView Profile
In CAQH ProView, providers can use the Practice Manager Module to streamline data entry. Practice managers can enter data for multiple providers, but the providers themselves must log in to review, import, and attest the information. This setup ensures that while credentialing tasks can be efficiently managed, the provider retains control and oversight of their profile.
Maintaining Your CAQH Profile
- Keep It Current: Regularly update your profile with any changes in your information, such as new jobs, new licenses, or updated insurance details.
- Re-Attest: Every 120 days, you’ll need to re-attest that your information is up-to-date. CAQH will send you reminders, so you don’t forget.
Tips for Using CAQH ProView Effectively
- Be Thorough: Ensure every section is complete and accurate. Incomplete profiles can delay the credentialing process.
- Stay Organized: Keep digital copies of all your documents in one place so you can easily upload them when needed.
- Check for Errors: Review your profile regularly to catch and correct any mistakes.
Benefits of Using CAQH ProView
Using CAQH ProView can greatly simplify and improve your credentialing process. Here’s how it benefits you directly:
- Saves Time: You only need to fill out your credentialing information once in CAQH ProView, instead of completing multiple applications for different insurance companies. This efficiency frees up your time for patient care and other important tasks.
- Streamlines the Process: Insurance companies can quickly access and verify your information through CAQH ProView, which speeds up the credentialing process. This means you can get credentialed faster and start seeing patients sooner.
- Reduces Paperwork: With CAQH ProView, most of your documents can be uploaded and managed online. This reduces the need for physical paperwork and makes it easier to keep everything organized and up-to-date.
- Required by Some Insurances: Many insurance companies require a CAQH profile as part of their credentialing process. Having a complete and up-to-date profile ensures that you meet these requirements, increasing your chances of being accepted by a wider range of payors.
- Prevents Recredentialing Lapses: Keeping your CAQH profile current helps prevent lapses in recredentialing. Payors often use CAQH to verify ongoing compliance, so regular updates and re-attestations ensure your credentialing status remains active without interruptions. This means continuous service to your patients and steady reimbursements without the hassle of recredentialing delays.
How pie can help
Mastering these healthcare portals is a critical step in the credentialing process for your mental health practice. While it may seem daunting, remember that you’re not alone—pie Health is here to help. For more detailed information and step-by-step guidance, download The Complete Guide to Credentialing and Billing for Mental Health Practices. And if the process becomes overwhelming, our team is ready to provide full-service support tailored to your needs.


Comments ()